Posts

To Love/To Be Loved Blog Hop - Day 1
Image
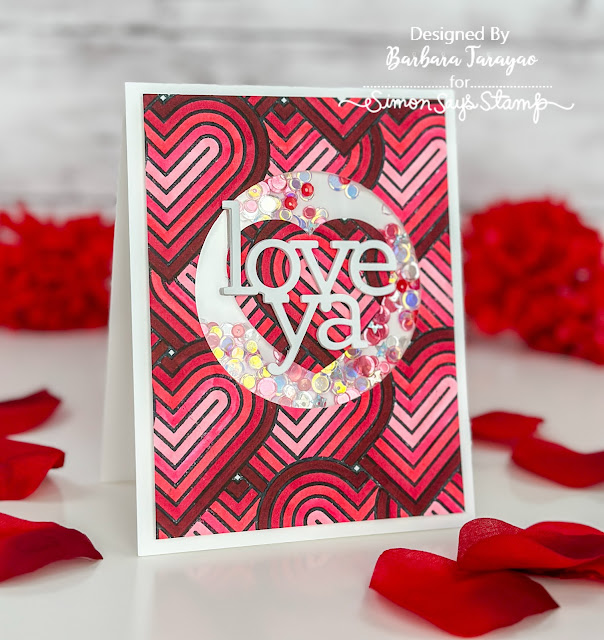
I'm happy to be participating in day 1 of the Simon Says Stamp To Love and To Be Loved  blog hop. I am sharing 3  projects featuring the Tucked Hearts background stamp from the To Be Loved release . Steps: Stamp the Tucked Hearts background stamp onto white cardstock panel using a copic friendly black ink.  Color with pink and red copics. R59, RV29, RV25 and RV02.  Cut out desired size circle using nested circle dies. Cut a heart shape from that circle. Glue acetate to the back of panel to create a window. Adhere heart to the front of the panel window. Add foam tape all around the back of the panel to create a well for the shaker element.  Add shaker bits and add a piece of thin white paper trimmed down to enclose shaker bits. Die cut sentiment from white cardstock and adhered in the middle of heart. Steps: Stamp the Tucked Hearts background stamp onto white cardstock using a copic friendly black ink.  Color each heart with copic markers. R39, R37, R29 ...

Simon Says Stamp To Be Loved Release Day

Image
Hello crafty friends! I am so happy to be sharing a project using some goodies from the new Simon Says Stamp To Be Loved release . I am featuring the gorgeous Dancing Floral 3d embossing folder and the I'm Sorry die from this new release .  I will be using one of my new favorite techniques from 2024!  I began with an A2 size card base made from smooth white cardstock. I then trimmed down another piece of white cardstock to run through the Dancing Floral embossing folder . I used copic marker to color in the "debossed" images. I then used an oxide ink pad and dragged it over the top of the entire panel of the colored images. I used a coordinating copic marker to add a few dots around the inked images. I die cut the I'm Sorry sentiment die and background from more white cardstock. I used distress ink to addd color to the background. I stamped the sub-sentiment on a strip of white cardstock and trimmed it down with scissors. I added a bit of gold twine to finish this pr...

Altenew Get Into Shape

Image
 Hi all and welcome to another week of the  Simon Says Stamp Wednesday Challenge . This week's challenge theme is  Get Into Shape We are featuring products from Altenew . You don't have to use them to join in but if you have some we would to see what you make. As always just for entering you will be eligible for the drawing of a  $25 voucher to the Simon store! This week's theme is to make a shape card not using squares or rectangles. I have decided to make a shape card made from Altenew's Scandinavian Tag die set . It's a nice large beautiful tag. Just perfect for a card. So simple to create a top folding card out of a tag die. I cut two tags.  I used a scoring board and stylus to create a hinge on one of the tags. This will be your bottom tag.  I adhered adhesive above the score line and added the other cut tag on top. I used the scoring board to help line it up perfectly. Now that I have my tag card base I can decorate the top. I made two tags using dai...

Pretty Pink Posh Valentine's Blog Hop - Day 3

Image
Welcome to the Pretty Pink Posh January release  Blog Hop! I'm excited to share some projects that I have created using some of the adorable products from the new release . Pretty Pink Posh is giving away three $30 gift certificates - one for each day of the hop. Leave comments along the blog hop for lots of chances to win! This card features the new Pretty Pink Posh Valentine Cake Pops die se t. This set has lots of images that work together so you can create gorgeous cake pops. I used one of the die images from the new Valentine Holder Addition dies . I die cut the gift box and bow out and colored them with copic markers. The sentiment is from the new Valentine Greetings stamp set . I used the coordinating dies to cut it out. This card features the Love Word Shaker die set . I wanted to show the versatility of this die set. I die cut the centers of the letters from pattern paper to keep it simple and easy to make if you wanted to create lots of valentines to have on hand. Th...

Sparkling Candles set of cards

Image
Hello crafty friends! Today's post will feature the Sparkling Candles die three ways. I will show you simple ways to step up your card making.   Clean and simple: This card uses lots of white space on an A2 size card base cut from smooth white cardstock. I used only the base of the candle dies . I used white gel pen detail and stickles for the flames. I added a sentiment from my stash. Any sentiment will do! Add another step: I used the same candle dies but I used the extra layer that is included in the set. I added a cream panel to the white cardbase.   I added a layer the same color as the candle. Add a few more steps: This card features the same cream panel but this time I ran it through a 3d embossing folder for texture. I also added a few more colors to the the layers of the candles. Just by mixing up the layer colors of the candles adds extra dimension. This was so much fun and I hope you got some inspiration. Please leave me a comment if you have any questio...

Whimsy Stamps Something New

Image
Hi all and welcome to another week of the  Simon Says Stamp Wednesday Challenge . This week's challenge theme is  Something New We are featuring products from Whimsy Stamps . You don't have to use them to join in but if you have some we would to see what you make. As always just for entering you will be eligible for the drawing of a  $25 voucher to the Simon store! Today I am sharing a fun card featuring the adorable Whimsy Stamps Panda Butt stamp set. It also happens to be New Year's Day so I have made a card for the occasion. I began with an A2 size card base made from white cardstock. I then die cut a panel of pattern paper using a stitched rectangle die to leave a bit of a white border. I then die cut snow drifts using stitched hillside border dies from more white cardstock. I adhered the snow drifts to the panel and trimmed off the excess. I then stamped the images from the Panda Butt stamp set and colored them using copic markers. I fussy cut them out and arrange th...

Tumbling Flowers birthday cards

Image
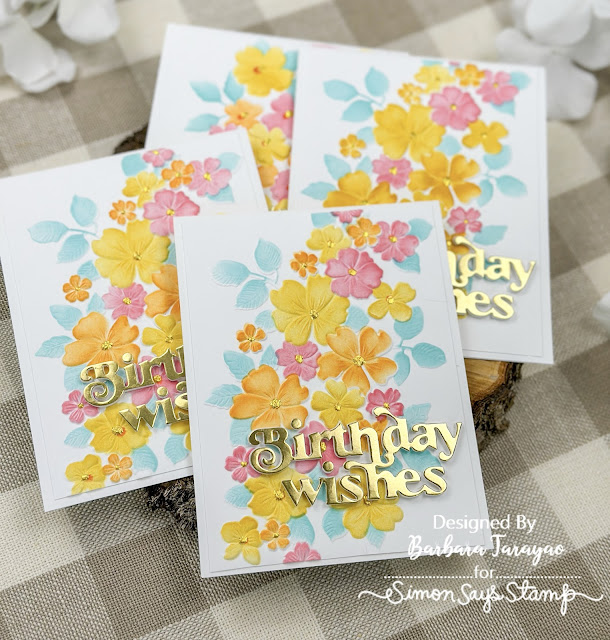
Hello! I am happy to share an super easy, yet beautiful, technique to create lots of birthday cards. It's a new year and I love have on hand lots of birthday cards to send and to share with friends and family.   I began with an A2 size card base made from smooth white cardstock.  I then took another piece of white cardstock and ran it through the  Tumbling Flowers embossing folder . I used the coordinating  Tumbling Flowers set of stencils  to some simple ink blending for each raised flower. I then trimmed the inked and embossed panel down and adhered it to the card base. I die cut the birthday sentiment using the  Birthday Wishes die  from gold cardstock and fun foam for some dimension. I adhered it to the lower right side of the card. Last, I used gold watercolor to the centers of each flower for a bit of shine. I have created a reel over on my Instagram page that demonstrates the process. I hope you were inspired to make lots of wonderful birth...