Posts

Showing posts from January, 2025

Trio of Daisy cards

Image
I used to hoard pattern paper like crazy back when I was a big scrapbooker years ago. I still have a small stack of gorgeous pattern paper that has never been used. So I have been trying to incorporate pattern paper more and more into my projects. I have created a trio of birthday cards for this post using some of that paper from my stash. Also on this post, I want to share a fun trick to get more out of your dies by cutting them up to manipulate the pieces to create your own design. I die cut out 3-4 daisy heads for each card out of white cardstock. I colored the centers of the daisies with copic markers. I then chose the Layered Perky Flower die set to use the stems and leaves for my daisies. I used detail scissors to cut them apart to add them where I wanted. I then chose some pattern paper from my stash to cut down to fit the front on an A2 card base. I used a stitched rectangle die to cut each piece of pattern paper to the same size. I adhered them to the front of the card base to...

Spellbinders Anything Goes

Image
 Hi all and welcome to another week of the  Simon Says Stamp Wednesday Challenge . This week's challenge theme is  Anything Goes We are featuring products from Spellbinders . You don't have to use them to join in but if you have some we would to see what you make. As always just for entering you will be eligible for the drawing of a  $25 voucher to the Simon store! For this week's theme I am using the gorgeous Spellbinder's Coastal Escape View die set . I grew up just a mile from the beach and have so many fond memories of the ocean so I just love making cards that feature a nautical theme. I began with an A2 size card base cut from smooth white cardstock. I then used a wonky stitched rectangle die to cut a white panel. Using distress ink I blended a warm yellow color all over the panel. I then cut the wave image from the die set and inked them using the same yellow color and adhered them all around the inked panel for a interesting background. I trimmed off the exce...

Birthday Gifts card

Image
I try to stockpile birthday cards to use for the upcoming year. Do you make lots to have hand or are you more an "as need to make" person? Let me know in the comments. 💗 I began with an A2 size card base made from smooth white cardstock. I then created a textured background panel by using a stencil and white matte stencil paste. I set that aside to dry while I die cut the presents.  I used up some scraps from left of pieces of cardstock to create the presents. I adhered them together with liquid glue and then added them to the stenciled panel with foam squares. I then used the  CZ Design Birthday Basics stamp and dies  to create my sentiment. I first stamped it in red oxide ink and then a top layer of clear ink so I could add clear embossing powder to heat set it for a bit of dimension. I hope you enjoyed the project I have made for this challenge and got some inspiration! For your convenience I have listed and linked the supplies I have used below. Thank you so much for...

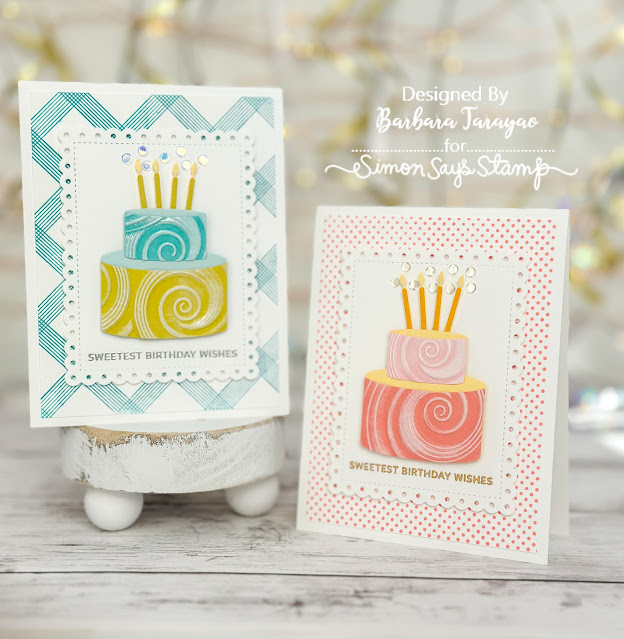
Fancy Cake birthday cards

Image
Hello crafty friends! Sharing a couple of projects today that feature a fun technique of using an embossing folder to add texture to your die cuts. I have a quick reel over on my Instagram page that demonstrates the basic idea how to do this. You can use any embossing folder on pretty much any die cut that lends itself to a textured surface. Just a fun way to step up those die cuts! Each card was made with an A2 top folding card base cut from smooth white cardstock. Each panel was stamped with a background stamp and trimmed down to leave a bit of a white border. I stamped the sentiment using clear sticky ink and gold/silver embossing powder that I heat set to make it shine. I then used a scalloped eyelet rectangle die to cut out a decorative frame.  I then die cut the elements from the Simon Says Stamp Fancy Cake die set to build a birthday cake. I cut them from scraps of colored cardstock. I ran them through one of my favorite embossing folders for texture. Using a white pigment...

Riley & Co. Funny/Punny

Image
 Hi all and welcome to another week of the  Simon Says Stamp Wednesday Challenge . This week's challenge theme is  Funny/Punny We are featuring products from Riley & Co. You don't have to use them to join in but if you have some we would to see what you make. As always just for entering you will be eligible for the drawing of a  $25 voucher to the Simon store! For this week's theme I used a stamp and die set that would definitely fall under the category of "punny". I stamped some of the images from the Oh, Shiitake stamp and die set using black copic friendly ink and then colored them with shades of red copic markers. I stamped the sentiments in coordinating colors and die cut them out and set them aside. Next, I used a gingham stamp to create a fun colorful background. I masked off a rectangle using post it tape on a piece of white cardstock. I used my MISTI to make sure I got great ink coverage. I then die cut the stamped panel out using a wonky stitched r...

Love You So Much card

Image
Hello crafty friends! I am encouraging you to shop your stash today. I'm sharing a project using a few of my favorite items to make a fun Valentine card or just a card for any reason to let someone know you love them. This card was made with an A2 size card base cut from smooth white cardstock. I then ran a 1/4 size piece of white cardstock through an embossing folder and added that embossed panel to the card cardbase. I then die cut a nesting rectangle frame from red cardstock for my card front.  I then chose a set of flower dies and a set of leaf dies to create a textured heart shape. I cut the flowers and leaves from scraps of red, pink and coral cardstock. I then chose from nesting heart dies a size of heart to fit in the center of my card front. I then added the flowers and leaves to the heart with foam squares. I trimmed off the excess and stamped a sentiment from more red cardstock and used a sentiment strip die to cut the sentiment out. I added that across the with liquid g...

Hero Arts Clean and Simple

Image
 Hi all and welcome to another week of the  Simon Says Stamp Wednesday Challenge . This week's challenge theme is  Clean and Simple We are featuring products from Hero Arts . You don't have to use them to join in but if you have some we would to see what you make. As always just for entering you will be eligible for the drawing of a  $25 voucher to the Simon store! This week's theme is Clean and Simple. My take was to use simple stamping using the Hero Arts Color Layering Sunset Over Waves stamp set . I made my own white wood paneling using a scoring board and distress ink using white cardstock. I then used a another piece of white cardstock with the Hero Arts Color Layering Sunset over Waves stamp set.  I used a stamping tool line up the images from the set to create the sunset. I trimmed it out using one of the nesting arch shapes. I then die cut out a window to frame it also using white cardstock. I then stamped the sentiment and seashells from the Beachcombi...